Mastering the art of Sourdough Focaccia is a rite of passage for every home baker seeking that perfect combination of a crispy, fried-bottom crust and a cloud-like, airy interior. This recipe focuses on creating a high-hydration dough that yields those coveted, translucent, thin-walled air bubbles that look stunning under a soft natural daylight glow.
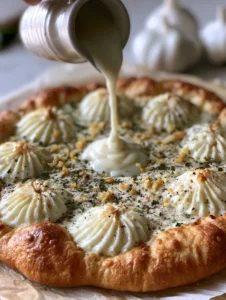
There is nothing quite like the sensory experience of pressing your fingers into a pillowy sourdough dough, creating deep dimples that hold glistening pools of extra virgin olive oil. When baked to a pale gold with darker toasted brown peaks, this bread becomes the centerpiece of any table, garnished with the sharp aroma of fresh rosemary and the crunch of coarse sea salt flakes.
In this guide, we will leverage the power of wild yeast and long fermentation to develop a complex flavor profile that store-bought yeast simply cannot replicate. By using a dark metal baking pan, we ensure the edges of the bread become incredibly crispy and slightly detached from the pan walls, providing that professional artisan finish every single time.

The Secret to Achieving High-Hydration Bread Perfection
- Visual Texture: Expect a surface defined by deep finger-pressed dimples and large, prominent air bubbles that shatter when bitten.
- Color Profile: A beautiful gradient of pale gold across the surface with contrasting toasted brown peaks on the bubble tops.
- The Crumb: An open, airy internal structure that remains soft and chewy, thanks to the natural acidity of the sourdough starter.
- Salty & Herby Finish: A generous scattering of white sea salt flakes and vibrant green fresh rosemary needles provides a sharp, savory punch.
The Foundation: Premium Ingredients for Sourdough Focaccia
To achieve the visual result described in our blueprint, every ingredient must serve a specific structural or flavor-driven purpose. High-quality flour and active starter are the non-negotiables for this artisan bake.
Strong Bread Flour: You will need 4 cups (500g) of high-protein bread flour to provide the gluten strength required to trap those massive air bubbles. The higher protein content ensures the dough doesn’t collapse during the long fermentation process.
Active Sourdough Starter: Use 1/2 cup (100g) of bubbly, active starter that has been fed within the last 4-8 hours. This is your only leavening agent, responsible for the rise and the characteristic tangy sourdough flavor profile.
Filtered Water: 1 2/3 cups (400ml) of lukewarm water creates an 80% hydration dough. This high water content is what allows the dough to be extensible enough to form those large, translucent bubbles during the final proof.
Extra Virgin Olive Oil: You will use 1/4 cup (60ml) for the dough and an additional 3 tbsp (45ml) for the pan and dimpling. The oil is essential for that “fried” crust texture and for creating the glistening pools in the crevices of the bread.
Fine Sea Salt: 2 tsp (10g) is mixed into the dough to regulate fermentation and enhance the wheat’s natural sweetness. This is distinct from the coarse flakes used for the final decorative garnish.
Fresh Rosemary: 2-3 sprigs of fresh rosemary needles provide a vibrant green color and a piney aroma. Avoid dried rosemary, as it lacks the visual pop and essential oils found in fresh needles.
Coarse Sea Salt Flakes: 1 tbsp (15g) of large white flakes, such as Maldon, creates the crystalline visual appeal and provides a burst of salinity in every bite. These flakes catch the light beautifully against the toasted brown peaks of the dough.
Essential Tools for Artisan Baking Success
The equipment you use is just as important as the ingredients when aiming for a specific visual outcome. For this Sourdough Focaccia, the pan choice is the most critical factor in achieving the right crust.
Dark Metal Baking Pan: A 9×13 inch (23x33cm) dark metal pan is required to absorb and distribute heat efficiently. This ensures the edges of the bread are crispy and slightly detached from the pan walls, rather than being soft or pale.
Large Glass Mixing Bowl: Using a clear bowl allows you to monitor the fermentation progress and see the air bubbles forming from the side. This is helpful for judging when the bulk fermentation is complete.
Kitchen Scale: For professional results, weighing your ingredients in grams is highly recommended. While imperial measurements are provided, the precision of a scale ensures the hydration level is exactly where it needs to be for those translucent bubbles.

Step-by-Step Evolution of the Sourdough Focaccia
1. Creating the Autolyse and Mixing
In your large mixing bowl, combine the active sourdough starter and the lukewarm water, whisking until the starter is mostly dissolved. Add the bread flour and stir until a shaggy dough forms with no dry flour remaining.
Cover the bowl with a damp cloth and let it rest for 30 minutes. This process, known as autolyse, allows the flour to fully hydrate and kickstarts gluten development before the salt is even added.
2. Adding Salt and Bulk Fermentation
Sprinkle the fine sea salt over the dough along with a splash of water. Use your hands to squeeze the salt into the dough, then begin a series of “stretch and folds.”
Grab one side of the dough, pull it upward until you feel resistance, and fold it over the center. Rotate the bowl and repeat this 4 times; perform 4 sets of these folds every 30 minutes to build strength and structure.
3. The Long Cold Proof
After your final set of folds, cover the bowl tightly and place it in the refrigerator for 12 to 24 hours. This cold retard is the secret to the sourdough’s complex tang and the formation of those thin-walled, translucent bubbles.
During this time, the yeast works slowly, and the gluten relaxes. The cold temperature also makes the dough easier to handle when you eventually transfer it to the dark metal baking pan.
4. Pan Proofing and Creating Deep Dimples
Generously coat your dark metal pan with 2 tbsp (30ml) of extra virgin olive oil. Gently transfer the cold dough into the pan, flipping it once to coat both sides in oil.
Let the dough proof at room temperature for 2-4 hours, or until it has spread to the corners of the pan and looks incredibly jiggly and full of air. Drizzle the remaining olive oil over the top and use your fingertips to press deep dimples all the way to the bottom of the pan.
5. Garnishing for Visual Impact
This is where the Sourdough Focaccia truly takes shape. Scatter the fresh rosemary needles and the coarse sea salt flakes over the surface, ensuring some fall into the oil-filled crevices.
Observe the large bubbles rising to the surface; these should appear thin and almost translucent. If the dough resists dimpling, let it rest for another 15 minutes before trying again.
6. The High-Heat Bake
Preheat your oven to 425°F (220°C). Slide the dark metal pan onto the center rack and bake for 20-25 minutes.
Watch for the Maillard reaction to take hold, turning the dough a pale gold with darker toasted brown peaks on the bubble surfaces. The edges should be golden brown and visibly pulling away from the sides of the pan.
Pro Tips for Artisan-Level Results
- Watch the Jiggle: Before dimpling, shake the pan gently. The dough should move like a bowl of Jello; if it doesn’t jiggle, it needs more proofing time.
- Temperature Control: If your kitchen is cold, your room temperature proofing may take longer. Aim for a warm, draft-free spot to encourage those large bubbles.
- Oil is Your Friend: Do not skimp on the olive oil. It is what prevents the bread from sticking to the dark metal pan and gives the bottom that signature crunch.
- Dimple Deeply: Don’t be afraid to touch the bottom of the pan with your fingers. This creates the landscape for the oil to pool and prevents the bread from rising too evenly like a standard loaf.
Perfect Pairings and Serving Suggestions
This Sourdough Focaccia is a versatile powerhouse in the kitchen. For a Mediterranean-inspired lunch, serve it alongside a bowl of Creamy Feta and Green Olive Dip. The tang of the feta perfectly complements the sourdough base.
If you are hosting a summer gathering, use a thick slice to scoop up some Tomato Bruschetta Dip. The crispy edges of the focaccia provide the perfect structural support for the juicy tomatoes.
For a heartier meal, this bread is an excellent side for Greek Chicken Gyros or even a refreshing Cucumber Beetroot Salad. The rosemary and salt notes bridge the gap between savory meats and bright, acidic vegetables.
Managing Your Sourdough Bake: Storage and Reheating
Focaccia is best enjoyed the day it is baked, while the “pale gold” crust is at its crispest. However, if you have leftovers, store them in an airtight container at room temperature for up to 2 days.
To revive the texture, avoid the microwave. Instead, place slices in a 350°F (175°C) oven or toaster oven for 5 minutes. This will re-crisp the bottom and soften the interior, bringing back that fresh-baked feel.
You can also freeze the baked focaccia for up to 3 months. Simply wrap individual slices in foil and place them in a freezer bag. Reheat directly from frozen in the oven until warmed through.
Answering Your Sourdough Focaccia Questions
This specific recipe is designed for a sourdough starter. If using yeast, the fermentation times will be much shorter, and you will lose the characteristic sourdough tang and bubble structure.
While you can use glass or ceramic, a dark metal pan is best because it absorbs heat faster, ensuring the edges are crispy and the bottom gets that ‘fried’ texture.
Look for a pale gold surface with darker toasted brown peaks. The edges should be crispy and slightly detached from the pan walls.
Always use a high-quality Extra Virgin Olive Oil. Since the oil is a primary flavor component, a robust, peppery oil will enhance the artisan taste of the bread.
Large bubbles are a result of high hydration (80%+) and a long cold fermentation. If your dough is too dry or under-proofed, the bubbles will be small and dense.
The Ultimate Sourdough Focaccia Recipe

Sourdough Focaccia: The Ultimate Artisan Guide to Bubbles and Gold
Ingredients
Equipment
Instructions
- Whisk starter and water together. Add flour and stir into a shaggy dough. Rest 30 minutes.
- Add fine sea salt and perform 4 sets of stretch and folds every 30 minutes.
- Cover and refrigerate for 12-24 hours for flavor development.
- Transfer dough to an oiled dark metal pan. Let rise for 2-4 hours until jiggly and full of bubbles.
- Drizzle with olive oil and press fingers deep into the dough to create dimples.
- Top with rosemary and salt flakes. Bake at 425°F (220°C) for 20-25 minutes until golden brown.
Notes
Use a dark metal pan for the crunchiest bottom crust.

Join the Artisan Baking Community
Creating this Sourdough Focaccia is a labor of love that rewards you with incredible flavor and stunning visual appeal. We would love to see your bubbly creations! Tag us in your photos and share your baking journey with others.
If you enjoyed this recipe, please leave a comment below and share it with your fellow bread enthusiasts. For more artisan inspiration, follow us on Pinterest and sign up for our newsletter to get new recipes delivered straight to your inbox.