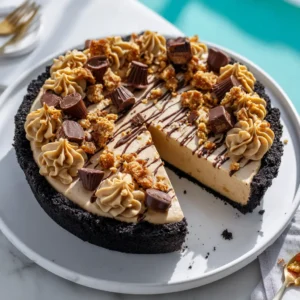
There is nothing quite like slicing into a perfectly baked Peanut Butter Cake to reveal a moist, tender golden-brown crumb. If you are a peanut butter enthusiast, this recipe is designed specifically to fulfill all your dessert cravings. It pairs rich, nutty flavors with a remarkably soft and delicate texture that melts in your mouth.
Every element of this cake has been meticulously crafted to ensure professional-bakery results in your home kitchen. From the perfectly balanced cake base to the incredibly smooth, light tan creamy peanut butter frosting, it is a true showstopper. You will love the stunning visual contrast of the thick swirled frosting against the golden layers.
Garnished with a generous scattering of chopped roasted peanuts and a glossy, thick peanut butter drizzle, this dessert is a textural masterpiece. Prepare to impress your family and friends with a layered cake that looks just as incredible as it tastes. Grab your mixing bowls, and let’s dive into this unforgettable culinary creation.
Why You’ll Love This Recipe
- Moist, Tender Crumb: The use of buttermilk and brown sugar guarantees a golden-brown cake base that stays perfectly hydrated and soft for days.
- Irresistible Textural Contrast: The combination of the smooth, light tan creamy peanut butter frosting and the crunchy chopped roasted peanuts offers the ultimate bite.
- Professional Aesthetics: The glossy, thick peanut butter drizzle and soft thick frosting swirls make this cake look like a beautiful, unedited masterpiece fresh from a high-end bakery.
- Deep Nutty Flavor: Incorporating real creamy peanut butter into both the batter and the frosting ensures a robust, authentic flavor without being overly sweet.
- Foolproof Layering: The sturdy yet tender crumb provides a structurally sound base, making it incredibly easy to stack and thickly frost without crumbling.
Ingredients & Substitutions

For the Peanut Butter Cake Crumb
All-Purpose Flour: You will need 2 ½ cups (300g) of all-purpose flour to provide the structural backbone of the cake. It contains just the right amount of protein to hold the heavy peanut butter without making the cake dense.
Baking Powder & Baking Soda: Use 1 ½ tsp (6g) of baking powder and ½ tsp (3g) of baking soda for optimal lift. This specific leavening combination reacts with the buttermilk to create those beautiful, airy pockets in the tender crumb.
Kosher Salt: Adding 1 tsp (6g) of kosher salt is a non-negotiable step in dessert baking. It neutralizes any cloying sweetness and acts as a flavor amplifier for the roasted notes of the peanut butter.
Unsalted Butter: Start with 1 cup (226g) of unsalted butter, softened to room temperature. Creaming this butter creates microscopic air bubbles that ensure the golden-brown layers bake up incredibly light and fluffy.
Creamy Peanut Butter: You will need ¾ cup (190g) of conventional creamy peanut butter (like Jif or Skippy) for the cake batter. Avoid natural, oil-separated peanut butters here, as their liquid inconsistency can compromise the cake’s structural integrity.
Granulated White Sugar: Include 1 cup (200g) of granulated sugar to tenderize the crumb and provide clean, sharp sweetness. As it bakes, it helps the edges of the cake achieve that gorgeous, slightly caramelized golden-brown crust.
Light Brown Sugar: Add 1 cup (200g) of firmly packed light brown sugar to the batter. The molasses content in brown sugar retains moisture during baking, guaranteeing a perpetually soft, tender crumb.
Large Eggs: Incorporate 4 large eggs (200g total), ensuring they are at room temperature before mixing. The egg yolks add richness and fat, while the whites act as a binding agent to give the cake its sturdy, layer-ready structure.
Pure Vanilla Extract: Pour in 1 tbsp (15ml) of high-quality pure vanilla extract. Vanilla works invisibly to round out the nutty flavors, providing a floral, aromatic background note.
Buttermilk: Measure out 1 cup (240ml) of room-temperature buttermilk. The lactic acid tenderizes the gluten strands in the flour, which is the culinary secret to an ultra-moist cake.
For the Smooth Creamy Peanut Butter Frosting
Unsalted Butter: Use 1 cup (226g) of very soft unsalted butter as the base of your frosting. Whipping it thoroughly creates a pale, voluminous foundation that easily accepts the peanut butter.
Creamy Peanut Butter: Add 1 cup (250g) of conventional creamy peanut butter to the frosting. This yields that signature light tan color and an incredibly smooth, spreadable consistency.
Powdered Sugar: Sift in 4 cups (480g) of powdered sugar to sweeten and thicken the frosting. Sifting prevents lumps, ensuring the final texture is completely velvety and easy to swirl.
Heavy Whipping Cream: Splash in ¼ cup (60ml) of heavy whipping cream while beating the frosting. This incorporates extra air, allowing you to create those stylized, soft thick swirls on top of the cake.
For the Visual Garnish
Chopped Roasted Peanuts: Roughly chop ½ cup (75g) of roasted, lightly salted peanuts. Scattering these across the top provides a much-needed savory crunch that breaks up the rich frosting.
Thick Peanut Butter Drizzle: Reserve ¼ cup (60g) of creamy peanut butter to melt down for the final touch. This creates the glossy, thick peanut butter drizzle that drips beautifully over the frosted edges.
Equipment Needed
- Stand Mixer or Hand Mixer: Essential for thoroughly creaming the butter and sugars to achieve a light, airy batter.
- Two 8-inch Round Cake Pans: Provides the perfect depth for thick, structurally sound cake layers.
- Parchment Paper: Crucial for lining the bottom of your pans so the tender cakes release effortlessly.
- Offset Spatula: The best tool for applying the smooth, light tan frosting and creating stylized swirls.
- Cooling Racks: Allows air to circulate under the hot pans, stopping the baking process and preventing a gummy bottom layer.
Step-by-Step Instructions

1. Prepare the Pans and Oven
Begin by preheating your oven to 350°F (175°C). Ensure your baking rack is positioned right in the center of the oven for even heat distribution.
Generously grease two 8-inch round cake pans with non-stick baking spray or butter. Line the bottom of each pan with a tailored circle of parchment paper.
Dust the greased sides lightly with flour, tapping out any excess. This triple-protection method guarantees your tender cakes will slide out perfectly intact without tearing the golden-brown crust.
2. Whisk the Dry Ingredients
In a medium-sized mixing bowl, combine the 2 ½ cups (300g) of all-purpose flour, 1 ½ tsp (6g) of baking powder, ½ tsp (3g) of baking soda, and 1 tsp (6g) of kosher salt.
Use a balloon whisk to vigorously aerate the mixture for about 30 seconds. This evenly distributes the leavening agents so your cake layers rise perfectly flat without doming.
Set this dry mixture aside. Having your dry ingredients pre-whisked streamlines the mixing process and prevents you from over-working the batter later.
3. Cream the Butter, Sugars, and Peanut Butter
In the bowl of your stand mixer fitted with the paddle attachment, combine the 1 cup (226g) of softened butter, ¾ cup (190g) of creamy peanut butter, 1 cup (200g) granulated sugar, and 1 cup (200g) light brown sugar.
Beat the mixture on medium-high speed for a full 3 to 4 minutes. You are looking for a visual transformation: the mixture should turn pale, visibly fluffy, and increase in volume.
Stop the mixer halfway through and scrape down the bottom and sides of the bowl with a rubber spatula. This ensures no dense streaks of unmixed butter ruin your cake’s crumb.
4. Incorporate the Eggs and Vanilla
Turn the mixer down to medium-low speed. Add the 4 large room-temperature eggs into the batter one at a time.
Wait until each egg is fully absorbed before adding the next one. This careful emulsion process prevents the fat and water molecules from separating, keeping the batter flawlessly smooth.
Once all the eggs are incorporated, pour in the 1 tbsp (15ml) of vanilla extract. Beat for another 30 seconds until the aromatic oils are fully blended into the base.
5. Alternate Dry Ingredients and Buttermilk
With the mixer on its lowest speed, add exactly one-third of your whisked dry flour mixture to the bowl. Mix only until you see a few streaks of flour remaining.
Pour in half of your 1 cup (240ml) of buttermilk, mixing briefly until just combined. Follow with another third of the dry ingredients, then the remaining buttermilk.
Finish by adding the last third of the dry flour mixture. Stop the mixer immediately once the last streak of flour disappears; overmixing will overdevelop the gluten, resulting in a dense, tough cake rather than a tender crumb.
6. Bake the Cake Layers
Divide the thick, fragrant batter evenly between your two prepared 8-inch cake pans. Use a small offset spatula to smooth the tops so they bake evenly.
Place the pans on the center rack of your preheated oven. Bake for 30 to 35 minutes, resisting the urge to open the oven door during the first 25 minutes to prevent the cakes from collapsing.
You will know the cakes are ready when you smell a rich, nutty aroma and the tops form a deep golden-brown crust. A toothpick inserted into the very center should come out clean or with a few moist crumbs attached.
7. Cool the Cake Layers Perfectly
Remove the pans from the oven and set them carefully onto wire cooling racks. Allow the cakes to sit in their pans for exactly 15 minutes to firm up their delicate structure.
After 15 minutes, run a thin butter knife around the edges of the pans to loosen any sticky spots. Carefully invert the cakes onto the wire racks, peeling off the parchment paper circles.
Allow the golden-brown layers to cool completely to room temperature. Frosting a warm cake will cause the butter in your frosting to melt, leading to a disastrous, sliding mess.
8. Whip the Peanut Butter Frosting
While the cakes cool, wash your stand mixer bowl and attach a clean paddle attachment. Add the 1 cup (226g) of softened unsalted butter and beat on high for 2 minutes until creamy and pale.
Add the 1 cup (250g) of creamy peanut butter and beat for another minute until the two fats are seamlessly combined. The mixture should look incredibly smooth and light tan in color.
Turn the mixer to low speed and gradually add the 4 cups (480g) of sifted powdered sugar, one cup at a time. Once all the sugar is added, pour in the ¼ cup (60ml) of heavy whipping cream.
Increase the speed to medium-high and whip for 3 full minutes. The friction and aeration will transform the frosting into a voluminous, cloud-like texture that holds soft thick swirls effortlessly.
9. Assemble and Frost the Cake
Place one completely cooled cake layer upside down on a simple white ceramic dessert plate. Slather a thick, generous 1-inch layer of the creamy peanut butter frosting over the surface, smoothing it to the edges.
Place the second cake layer right-side up on top, pressing down very gently to secure it. Use an offset spatula to apply a crumb coat—a thin layer of frosting over the entire cake to trap any loose crumbs.
Chill the cake in the refrigerator for 15 minutes to set the crumb coat. Once chilled, thickly layer and fully frost the outside of the cake with the remaining smooth, light tan frosting.
10. Stylize, Garnish, and Drizzle
Use the tip of your offset spatula or the back of a spoon to create stylized, soft thick swirls in the top layer of the frosting. This gives the cake a highly desirable, artisanal bakery look.
Place your ¼ cup (60g) of reserved creamy peanut butter into a microwave-safe bowl. Microwave it for 15-20 seconds until it becomes warm and fluid, but not boiling hot.
Using a spoon, generously garnish the top perimeter of the cake with the ½ cup (75g) of chopped roasted peanuts. Finally, use a spoon to cascade the glossy, thick peanut butter drizzle over the top, letting it run dramatically down the swirled sides.
Expert Tips for Success
- Always use processed peanut butter: Natural peanut butters separate and release too much oil, which will collapse the cake’s tender crumb and cause the frosting to curdle and slide.
- Sift your powdered sugar: Even if your sugar looks fine, sifting it guarantees your light tan creamy frosting remains perfectly velvety, without a single chalky lump.
- Room temperature ingredients are critical: Cold eggs and cold buttermilk will cause the butter to seize in the mixing bowl, leading to a dense, unevenly baked crumb.
- Do not over-bake: Peanut butter naturally absorbs moisture. Pull the cakes out the moment a toothpick comes out clean to ensure that famous, melt-in-your-mouth moist texture.
- Control the drizzle temp: When melting the peanut butter for the glossy drizzle, only warm it slightly. If it is too hot, it will melt your beautiful, soft thick frosting swirls upon contact.
Storage & Reheating/Freezing
Because this Peanut Butter Cake is incredibly moist, it stores wonderfully. Keep the frosted cake in an airtight cake dome at room temperature for up to 3 days. The frosting acts as a seal, keeping the golden-brown crumb tender and hydrated.
If you need to keep it longer, store it in the refrigerator for up to 5 days. Before serving, you must let the slices sit at room temperature for at least 30 minutes; cold peanut butter cake will taste dense and the frosting will be hard.
To freeze, cut the cake into thick slices and wrap each slice individually in plastic wrap, followed by a layer of aluminum foil. Freeze for up to 3 months, and simply thaw overnight in the refrigerator before bringing to room temperature to eat.
What to Serve With This
A rich, decadent dessert like this demands thoughtful pairings. If you are hosting a large gathering, consider serving this alongside a spread of contrasting sweets, like our chocolate-peanut-butter-marshmallow-cookies for the ultimate peanut butter lover’s dessert table.
If you prefer a tart contrast to cut through the richness of the cake, a slice of this pairs beautifully with fruit-forward desserts. Try offering it next to a classic homemade-apple-pie-recipe or a vibrant lemon-blueberry-pound-cake.
For an elegant dinner party, serve an unforgettable main course like authentic-jamaican-oxtail or a sophisticated steak-au-poivre-recipe. Finish the evening by pouring hot cups of dark roast coffee alongside thick slices of this layered peanut butter masterpiece, perhaps with a side of earl-grey-panna-cotta for variety.
Frequently Asked Questions
Yes! The baked, unfrosted cake layers can be wrapped in plastic wrap and stored at room temperature overnight or frozen for up to 3 months. Once frosted, the cake stays moist at room temperature for up to 3 days.
No, it is highly recommended to use conventional, processed creamy peanut butter (like Jif or Skippy). Natural peanut butter separates and releases too much oil, which will make the cake dense and cause the frosting to separate.
Because the frosting contains a high ratio of sugar to dairy (a small amount of heavy cream), it is safe to leave at room temperature in an airtight container or cake dome for 2-3 days. For longer storage, refrigerate it.
Simply warm a small amount of conventional creamy peanut butter in the microwave for 15-20 seconds. Do not overheat it. The natural fats will melt slightly, creating a beautiful, glossy cascade that sets up perfectly on the cooled frosting.
A dry crumb usually happens if the flour was over-measured or the cake was over-baked. Always spoon and level your flour, and remove the cake from the oven the moment a toothpick comes out clean or with a few moist crumbs.
Ready to Bake? Subscribe for More!
If you enjoyed making this luscious, deeply flavorful Layered Peanut Butter Cake, please leave a star rating and a comment below! We love hearing how our recipes turn out in your home kitchens.
Do not forget to subscribe to our weekly newsletter for more incredible baking guides, savory dinners, and exclusive culinary tips delivered straight to your inbox. Share your beautiful cake photos with us on social media!
Pin this recipe to your favorite dessert boards to save it for your next celebration. Happy baking!
Recipe Card
The Ultimate Layered Peanut Butter Cake
Ingredients
Equipment
Instructions
- Preheat your oven to 350°F (175°C). Generously grease two 8-inch round cake pans. Line the bottoms with parchment paper, and lightly dust the sides with flour.
- In a medium bowl, vigorously whisk together 2 ½ cups flour, 1 ½ tsp baking powder, ½ tsp baking soda, and 1 tsp kosher salt for 30 seconds. Set aside.
- In a stand mixer, beat 1 cup softened butter, ¾ cup creamy peanut butter, 1 cup white sugar, and 1 cup light brown sugar on medium-high for 3-4 minutes until pale and fluffy.
- Turn the mixer to medium-low. Add the 4 eggs one at a time, allowing each to incorporate fully. Add 1 tbsp vanilla extract and beat for 30 seconds.
- On low speed, alternate adding the dry ingredients in three parts and the 1 cup buttermilk in two parts, beginning and ending with the dry mixture. Mix until just combined.
- Divide the batter evenly between the prepared pans. Bake for 30-35 minutes until the tops form a deep golden-brown crust and a toothpick comes out mostly clean.
- Cool in the pans for 15 minutes, then invert onto wire racks. Remove parchment and allow the layers to cool completely to room temperature.
- For the frosting, beat 1 cup softened butter on high for 2 minutes. Add 1 cup creamy peanut butter and beat for 1 minute until light tan and smooth.
- Gradually mix in 4 cups sifted powdered sugar on low speed. Add ¼ cup heavy whipping cream. Increase speed to medium-high and whip for 3 minutes until voluminous.
- Place one layer on a serving plate. Spread a thick layer of frosting over it. Top with the second layer. Apply a thin crumb coat and chill for 15 minutes.
- Thickly frost the exterior of the chilled cake. Use an offset spatula to create stylized, soft thick swirls in the top layer of the frosting.
- Warm ¼ cup of peanut butter in the microwave for 15 seconds. Garnish the cake with chopped roasted peanuts, then cascade the glossy, thick peanut butter drizzle over the swirled frosting.
Notes
Tip 2: Ensure your buttermilk and eggs are at room temperature to prevent the batter from seizing and baking unevenly.