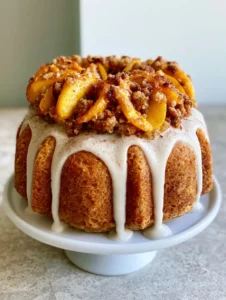
The Peaches and Cream Layer Cake is the ultimate architectural tribute to summer’s most prized stone fruit. Imagine three towers of golden, airy sponge, each cushioned by a cloud of vanilla bean-flecked whipped cream and crowned with a radial sunburst of fresh yellow peaches.
This isn’t just a dessert; it is a sensory experience that captures the warmth of a July afternoon. The visual hallmark of this masterpiece is the translucent, glossy amber peach syrup that cascades naturally down the sides, catching the light like liquid gold.
Whether you are hosting a garden party or celebrating a milestone, this cake delivers professional bakery aesthetics with the soul of a home-cooked classic. Let’s dive into the culinary science of creating this stunning centerpiece.

Why This Peaches and Cream Layer Cake is a Summer Showstopper
- Golden Sponge Texture: The cake layers are engineered to be sturdy enough for stacking but light enough to melt into the cream.
- Visual Precision: We use a radial peach arrangement and a specific syrup reduction to mimic the “unedited smartphone photo” aesthetic of professional food styling.
- Vanilla Bean Depth: Using real vanilla bean paste ensures those beautiful black specks are visible in every slice of the fluffy white frosting.
- Glossy Amber Finish: A specialized peach reduction provides that signature translucent drip that stays shiny even after hours of display.
The Anatomy of Our Golden Sponge and Amber Glaze
Cake Flour: 2 ½ cups (315g) of low-protein cake flour is essential for a fine, tight crumb that supports the weight of fresh fruit. It ensures the golden layers don’t become tough or bread-like.
Granulated Sugar: 1 ½ cups (300g) provides sweetness and aids in the browning process, giving the sponge its signature golden hue. It also stabilizes the egg structure during the mixing phase.
Unsalted Butter: 1 cup (225g) of softened butter is creamed to incorporate air, creating the foundation for a light and airy sponge. We use unsalted to have total control over the seasoning of the batter.
Whole Milk: ¾ cup (180ml) of room-temperature milk provides the necessary moisture and fat for a tender mouthfeel. It acts as the primary hydrating agent for the flour’s starches.
Yellow Peaches: 4 to 5 large, ripe peaches are the heart of the recipe. We use yellow peaches for their vibrant orange-yellow flesh and the balance of acidity they bring to the sweet cream.
Heavy Whipping Cream: 3 cups (720ml) of cold, high-fat cream (36%+) is required for the filling and topping. It must be whipped to stiff peaks to support the three-layer height without collapsing.
Vanilla Bean Paste: 2 tsp (10ml) provides the intense aromatic flavor and the forensic visual markers (tiny black seeds) that distinguish this from a basic vanilla cake.
Peach Syrup Foundations: ½ cup (100g) sugar and 1 tbsp (15ml) lemon juice are simmered with peach trimmings to create that “glossy amber” translucent syrup described in our visual blueprint.

Essential Gear for Bakery-Quality Results
To achieve the precise three-layer look on a simple white ceramic pedestal, you will need three 8-inch (20cm) round cake pans. This ensures even height across all layers without having to tort or slice the cakes horizontally, which can lead to crumbs in your pristine white cream.
A revolving cake stand and an offset spatula are your best friends for applying the thick, smooth vanilla bean whipped cream layers. For the radial peach pattern, a sharp paring knife is mandatory to ensure every slice is uniform and vibrant.
The Multi-Phase Journey to a Perfect Layer Cake
Phase 1: Crafting the Golden Vanilla Sponge
Preheat your oven to 350°F (175°C) and grease your three 8-inch pans thoroughly. In a large bowl, cream the butter and sugar for at least 5 minutes until the mixture looks pale and significantly increased in volume.
Whisk together your cake flour, 2 ½ tsp (10g) baking powder, and ½ tsp (3g) salt. Gradually add the dry ingredients to the creamed butter, alternating with the milk and 1 tbsp (15ml) of vanilla extract. Divide the batter equally and bake for 25-30 minutes until a tester comes out clean and the tops are a deep, even golden brown.
Phase 2: Developing the Glossy Amber Syrup
While the cakes cool, peel one of your peaches and finely dice it. Simmer the diced peach with ½ cup (100g) sugar and the lemon juice over medium heat. As the fruit breaks down, it will release its juices and turn a translucent, golden-orange color.
Strain the mixture through a fine-mesh sieve, pressing on the solids to extract every drop of flavor. Return the liquid to the pan and reduce until it reaches a honey-like consistency. This syrup will provide the “glossy amber” drips that define the cake’s aesthetic.
Phase 3: Whipping the Vanilla Bean Cream
Ensure your mixing bowl and whisk attachment are chilled. Pour in the cold heavy cream, ½ cup (60g) powdered sugar, and the vanilla bean paste. Whip on medium-high speed until the cream holds stiff, stable peaks.
Look for the visual cue: the cream should be thick enough to hold its shape when lifted, but still appear smooth and glossy. If it looks grainy, you have gone too far; add a tablespoon of unwhipped cream to smooth it out.
Secrets for Assembling Your Fruit-Crowned Centerpiece
Place your first golden sponge layer on the pedestal. Spread a generous 1-inch (2.5cm) layer of the vanilla bean whipped cream, smoothing it to the edges. Repeat with the second and third layers, ensuring the cake remains perfectly vertical.
For the crowning glory, slice the remaining yellow peaches into thin, uniform wedges. Arrange them in a radial pattern starting from the outer edge, overlapping them slightly as you move toward the center. This creates the vibrant “crown” effect seen in the visual prompt.
Finally, use a spoon to drizzle the cooled amber syrup over the fruit. Let it pool slightly in the center and then nudge it toward the edges so it “drips naturally” down the white sides of the cake. This technique provides the handheld, unedited smartphone photo look that is so popular in modern culinary photography.
Maintaining Freshness and Structure
This Peaches and Cream Layer Cake is best served within 4 hours of assembly to ensure the peaches remain vibrant and the cream stays stable. Because it uses fresh fruit and whipped cream, it must be stored in the refrigerator.
If you need to make it ahead, you can bake the sponge layers a day in advance and store them wrapped in plastic at room temperature. The syrup can also be prepared ahead of time and kept in a sealed jar in the fridge. For more peach inspiration, check out our classic fresh peach cake or try these easy peach crumble bars (coming soon).
Summer Sips and Pairings
Pair this delicate cake with a light, effervescent drink to balance the richness of the cream. A peach white wine spritzer is a sophisticated choice for an adult gathering.
For a family-friendly option, a glass of cold homemade peach lemonade provides the perfect acidic counterpoint to the golden vanilla sponge. If you have leftover fruit, a quick peach smoothie makes for a refreshing morning-after treat.
Professional Troubleshooting for Home Bakers
- Soggy Layers: Ensure your cakes are completely cool before adding the cream. A warm cake will melt the fat in the cream, causing the layers to slide.
- Dull Syrup: If your syrup isn’t “glossy,” it likely hasn’t reduced enough. Continue simmering until it coats the back of a spoon.
- Browning Peaches: Toss your peach slices in a tiny bit of lemon juice before arranging them to prevent oxidation and keep them “vibrant orange-yellow.”
- Cream Collapse: If your kitchen is hot, place your mixing bowl inside a larger bowl filled with ice water while you whip the cream to maintain stability.
While fresh yellow peaches are recommended for the best texture and ‘vibrant’ look, well-drained canned peaches can be used in a pinch. Be sure to pat them completely dry to prevent the cream from sliding.
The secret is reducing the peach juices and sugar until the mixture reaches a honey-like consistency. The addition of lemon juice helps keep the color bright and translucent.
Ensure the cake layers are completely cold before assembly. Using a high-fat heavy cream (at least 36%) and whipping it to stiff peaks in a chilled bowl also provides the necessary stability.
Store the cake in an airtight container in the refrigerator for up to 3 days. The syrup may soak into the cake over time, making it even moister, though the cream is best within the first 24 hours.
The Final Peaches and Cream Layer Cake Recipe


Peaches and Cream Layer Cake with Glossy Amber Syrup and Vanilla Bean Cream
Ingredients
Equipment
Instructions
- Cream softened butter and sugar for 5 minutes until light and fluffy.
- Mix in dry ingredients alternating with milk and vanilla. Divide into 3 pans.
- Bake at 350°F (175°C) for 25-30 minutes until deep golden brown. Cool completely.
- Simmer one diced peach with sugar and lemon juice; strain and reduce to a glossy amber syrup.
- Whip cold heavy cream with powdered sugar and vanilla bean paste until stiff peaks form.
- Layer sponge cakes with 1-inch thick layers of whipped cream between each.
- Arrange peach slices in a radial crown pattern and drizzle with the amber syrup so it drips naturally down the sides.
Notes
The syrup must be completely cool before drizzling to avoid melting the cream.
Join the Hearth Recipe Community
We hope this Peaches and Cream Layer Cake becomes the highlight of your summer baking season. There is something truly magical about the combination of golden sponge and fresh peaches that brings people together.
If you made this cake, we would love to see your results! Tag us in your photos or leave a comment below with your favorite summer fruit pairings. Don’t forget to save this recipe to your dessert boards on Pinterest for easy access all season long.