When the sun is high and the stone fruit is at its peak, nothing captures the essence of the season quite like a Mini Peach Upside-Down Cake. This isn’t just a smaller version of a classic; it is a meticulously crafted individual experience designed for the perfect fruit-to-cake ratio.
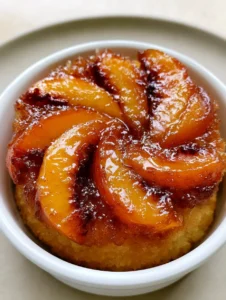
Imagine peeling back the edges of a warm dessert to find crescent-shaped peach slices arranged in a stunning fan pattern. These peaches are caramelized to a vibrant golden-orange, boasting glistening dark amber edges that hint at the deep brown sugar glaze beneath.
Every bite combines the syrupy, translucent topping with a moist, light golden-brown sponge cake that features a soft, tender crumb. This recipe focuses on the chemistry of caramelization and the structural integrity needed for a perfect ramekin release.

The Science of the Perfect Caramelized Peach Topping
The visual hallmark of this Mini Peach Upside-Down Cake is the glossy, translucent glaze that coats the fruit. To achieve this, we utilize the Maillard reaction and simple sugar caramelization occurring right at the base of your ceramic ramekin.
By layering butter and brown sugar before adding the fruit, you create a self-basting environment. As the peaches release their natural juices, they emulsify with the melting fats and sugars to form a thick syrup that rivals any gourmet bakery.
If you find yourself with an abundance of summer fruit after making this, you might also enjoy a peach cobbler for two (coming soon) which uses a similar small-scale approach to stone fruit desserts.
- Vibrant Visuals: Thinly sliced peaches arranged in a symmetrical fan create a professional, “handheld smartphone photo” aesthetic.
- Textural Contrast: A soft, moist sponge cake acts as the structural base, soaking up just enough syrup without becoming soggy.
- Controlled Portions: Using white ceramic ramekins ensures even heat distribution and provides a beautiful vessel for individual service.
- Glistening Finish: The brown sugar and butter glaze provides a high-shine, translucent coating that highlights the fruit’s natural color.
Essential Ingredients for a Golden Sponge and Amber Glaze
To recreate the exact look of our culinary blueprint, each ingredient serves a specific forensic purpose. We don’t just want flavor; we want the specific “golden-brown” visual and “soft crumb” texture described in the prompt.
Fresh Freestone Peaches: Use ripe but firm peaches to ensure they hold their crescent shape during the intense heat of baking. These will provide those signature vibrant golden-orange hues.
Unsalted Butter (75g / 5 tbsp): High-quality butter provides the fat necessary for a tender crumb and the base for our glossy glaze. Ensure it is at room temperature for the cake batter but melted for the topping.
Light Brown Sugar (50g / 1/4 cup): This is the secret to the amber edges. The molasses content provides the “translucent brown sugar glaze” effect that granulated sugar simply cannot replicate.
All-Purpose Flour (125g / 1 cup): This provides the structural foundation for our sponge. It’s the canvas upon which our fruit masterpiece is painted.
Baking Powder (1 tsp / 5g): This is an “invisible” essential ingredient. It creates the lift and airy pockets that define a “light golden-brown sponge cake.”
Whole Milk (60ml / 1/4 cup): Milk adds moisture and contributes to the golden color of the cake through the caramelization of milk sugars (lactose).
Large Egg: The protein in the egg provides the structure required to hold the weight of the caramelized peaches when the cake is inverted.

Tools Required for Ramekin Perfection
To achieve the “individual mini cake” look presented in a “small white circular ceramic ramekin,” you need the right kit. Precision is key when working with individual portions.
You will need standard 6-ounce (175ml) white ceramic ramekins. These are ideal because they provide a neutral background that makes the vibrant orange of the peaches pop, just like in our visual prompt.
A sharp paring knife is non-negotiable for cutting those “thin, crescent-shaped peach slices.” If your slices are too thick, they won’t fan out correctly; if they are too thin, they will disappear into the glaze.
While you have the peaches out, you may want to consider using your extra fruit for a fresh peach cake (coming soon) or even a refreshing peach smoothie (coming soon) to cool down after baking.
Step-By-Step Construction of the Mini Peach Upside-Down Cake
Preparing the Caramelized Foundation
Start by preheating your oven to 350°F (175°C). Place 1 teaspoon (5g) of melted butter into the bottom of each white ceramic ramekin, swirling to coat the sides.
Sprinkle 1 tablespoon (12g) of light brown sugar evenly over the butter. This layer is what will eventually become the “thick, glossy, translucent glaze” seen in the handheld photo style.
Designing the Peach Fan Pattern
Pit and slice your peaches into 1/4-inch (6mm) thick crescents. Starting from one side of the ramekin, overlap the slices in a circular fan pattern. Use 5-6 slices per ramekin to ensure full coverage.
Press the fruit gently into the sugar. You want the peaches to be in direct contact with the caramelizing agents to achieve those glistening dark amber edges during the bake.
Mixing the Moist Golden Sponge
In a medium bowl, cream together the remaining butter and granulated sugar until pale and fluffy. This aeration is vital for the “soft crumb” texture. Beat in the egg and vanilla extract until fully emulsified.
Whisk together your dry ingredients—flour, baking powder, and salt. Gradually add the dry mixture to the wet, alternating with the milk. Stir until just combined; overmixing will result in a tough cake rather than a tender sponge.
Baking and the Critical Visual Cues
Divide the batter evenly among the ramekins, smoothing the tops with a small spatula. Bake for 22-25 minutes. Look for the cake to pull away slightly from the edges and the top to be a “moist, light golden-brown.”
The most important sensory cue is the smell of toasted sugar and the sight of the glaze bubbling up around the edges of the cake. This indicates the peaches are fully caramelized.
Expert Tips for Success with Individual Cakes
- The 5-Minute Rule: Let the ramekins sit for exactly 5 minutes after removing them from the oven. This allows the glaze to set slightly so it doesn’t run off, but keeps it fluid enough for a clean release.
- Avoid the Center Pit: When slicing your fruit, ensure you are removing all of the woody pit material. Any fragments will ruin the “soft crumb” experience.
- Temperature Matters: Ensure your egg and milk are at room temperature. Cold ingredients can cause the creamed butter to seize, leading to an uneven grain in your sponge cake.
- Room for Expansion: Do not fill the ramekins to the brim. Leave about 1/2 inch (1.25cm) of space to allow the sponge to rise without overflowing.
Pairing and Serving Suggestions
While this Mini Peach Upside-Down Cake is a masterpiece on its own, it pairs beautifully with other stone-fruit-inspired treats. For a summer party, consider serving these alongside peach bellini cupcakes for a variety of textures.
If you prefer a colder accompaniment, a scoop of vanilla bean ice cream or a side of no-bake peach cheesecake (coming soon) can create a stunning dessert platter. The contrast between the warm, syrupy peaches and cold cream is world-class.
For those who love a bit of crunch, serving these mini cakes after a main course that ends with peach crumble bars (coming soon) provides a lovely thematic consistency to your menu.
Storage, Reheating, and Make-Ahead Advice
These cakes are best enjoyed warm, mere minutes after being inverted. However, if you have leftovers, they can be stored in an airtight container in the refrigerator for up to 3 days.
To reheat, place the cake (fruit side up) in a 300°F (150°C) oven for 8-10 minutes. This will revivify the “glossy brown sugar glaze” and soften the sponge back to its original state.
We do not recommend freezing these cakes once inverted, as the delicate cell structure of the caramelized peaches can become mushy upon thawing.
Frequently Asked Questions
It is best to bake the batter immediately once the baking powder is hydrated. However, you can prep the ramekins with the butter, sugar, and peaches up to 4 hours in advance.
While fresh peaches provide the best texture and ‘vibrant golden-orange’ color, you can use canned peach halves. Slice them thinly and pat them extremely dry to prevent the glaze from becoming too watery.
The amber edges come from the interaction of the brown sugar and the fruit’s natural sugars at high heat. Ensure your oven is fully preheated and use light brown sugar for the best caramelization.
Slice the peach into thin crescents using a sharp paring knife. Place them in the ramekin overlapping each other slightly, like a deck of cards, to create the professional fan look.
Sticking usually happens if the cake is cooled too long. The brown sugar glaze acts like glue once cold. Invert the cake exactly 5 minutes after it comes out of the oven for a clean release.
The Best Mini Peach Upside-Down Cake Recipe

Mini Peach Upside-Down Cake: The Ultimate Individual Summer Dessert
Ingredients
Equipment
Instructions
- Preheat oven to 350°F (175°C). Add 1 tsp melted butter and 1 tbsp brown sugar to each ramekin.
- Arrange 5-6 thin peach slices in a fan pattern on top of the sugar layer in each ramekin.
- Beat room temp butter and granulated sugar until light and fluffy. Mix in the egg and vanilla.
- Whisk flour, baking powder, and salt. Add to wet ingredients alternating with milk until just combined.
- Divide batter over peaches. Bake for 22-25 minutes until golden-brown and the cake pulls from the sides.
- Cool for 5 minutes, run a knife around the edge, and invert onto a plate to reveal the caramelized fruit.
Notes
Ensure the butter and sugar are evenly distributed at the bottom for a perfect glaze.

Closing & Call to Action
Mastering the Mini Peach Upside-Down Cake is a rite of passage for any home cook who loves the intersection of rustic charm and elegant presentation. The combination of the fanned peach wedges and that glistening amber glaze makes for a dessert that looks as good as it tastes.
If you enjoyed this forensic deep-dive into the perfect ramekin cake, please leave a comment below! We love hearing about your baking successes. Don’t forget to share your creations and follow us on Pinterest for more visually stunning recipes.