Classic Cream Puffs are the ultimate bakery-style dessert that you can master in your own kitchen. There is nothing quite as satisfying as pulling a tray of beautifully puffed, golden pastries out of your oven.
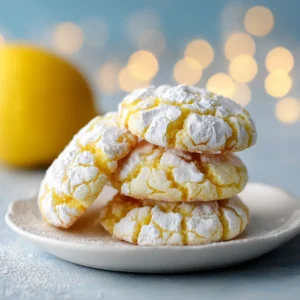
Picture a perfectly baked golden brown choux pastry shell, naturally cracked and slightly crisp to the touch. When you slice it in half horizontally, you reveal a generous, thick swirl of velvety vanilla pastry cream filling.
The top half of the shell rests gently on that thick cream layer, creating a stunning visual contrast. Finally, a light, even dusting of white powdered sugar elevates the entire dessert. Plated on a simple off-white ceramic dessert plate, these treats look exactly like they came from a French patisserie.
Why You’ll Love This Recipe
- Perfect Texture Contrast: The exterior choux pastry shell is baked golden brown and slightly crisp-looking, which pairs beautifully with the smooth filling.
- Velvety Filling: The thick vanilla pastry cream filling holds its shape perfectly when piped in a generous swirl.
- Bakery Visuals: The naturally cracked dough and the light dusting of white powdered sugar give these cream puffs a gorgeous, professional finish.
- Surprisingly Simple: Despite their fancy appearance, making choux dough requires only basic foundational ingredients and straightforward culinary techniques.
Ingredients & Substitutions
 1")
Whole Milk & Water
Using a 50/50 blend of 1/2 cup (120ml) whole milk and 1/2 cup (120ml) water creates the perfect liquid base for the choux dough. The milk adds tenderness and promotes a golden brown color, while the water helps create the steam needed for the perfect puff.
Unsalted Butter
You will need 1/2 cup (113g) of unsalted butter for the pastry and another 2 tbsp (28g) for the pastry cream. Butter provides essential fat that tenderizes the dough and creates a rich, velvety mouthfeel in the filling.
All-Purpose Flour
Exactly 1 cup (120g) of all-purpose flour provides the structural integrity for the pastry shells. It absorbs the boiling liquids to form a panade, which traps the steam during baking.
Granulated Sugar & Salt
A pinch of salt (1/2 tsp or 3g) and 1 tsp (4g) of sugar season the choux shells perfectly. You’ll also use 1/2 cup (100g) of sugar in the pastry cream to sweeten the egg yolks without overpowering the vanilla.
Large Eggs
You need 4 large whole eggs for the choux pastry to provide moisture, lift, and a glossy finish. For the pastry cream, 4 large egg yolks act as the primary emulsifier, creating a thick, luxurious texture.
Cornstarch
Using 1/4 cup (30g) of cornstarch in the pastry cream is the secret to a thick, stable filling. It allows the cream to hold a generous swirl without weeping or collapsing under the top shell.
Vanilla Bean Paste
Adding 1 tbsp (15ml) of high-quality vanilla bean paste or pure extract to the cream yields that signature bakery flavor. The visual specks of vanilla bean make the velvety vanilla pastry cream look stunning.
Powdered Sugar
A few tablespoons (around 30g) of powdered sugar are essential for the final garnish. This light dusting of white powdered sugar evenly covers the top shell for a classic finish.
Equipment Needed
- Medium Saucepan: Essential for boiling your liquids and cooking out the moisture from the choux panade.
- Stand Mixer or Hand Mixer: Crucial for beating the eggs into the dough until perfectly smooth and glossy.
- Piping Bags & Star Tip: A large star tip is needed to pipe the thick swirl of velvety vanilla pastry cream filling.
- Baking Sheet & Parchment Paper: Ensures your pastries bake evenly and release without sticking.
- Fine Mesh Sieve: Perfect for achieving that light dusting of white powdered sugar over the finished puffs.
Step-by-Step Instructions
1. Make the Vanilla Pastry Cream
In a medium saucepan, heat 2 cups (480ml) of whole milk until it just begins to simmer. In a separate bowl, vigorously whisk together 4 egg yolks, 1/2 cup (100g) granulated sugar, and 1/4 cup (30g) cornstarch until pale and smooth.
Slowly pour the hot milk into the egg yolk mixture while whisking constantly to temper the eggs. Return the entire mixture to the saucepan and cook over medium heat, whisking non-stop until the cream bubbles and becomes remarkably thick.
Remove from heat and whisk in 2 tbsp (28g) of unsalted butter and 1 tbsp (15ml) vanilla bean paste. Transfer to a bowl, press plastic wrap directly against the surface of the cream to prevent a skin, and chill in the refrigerator for at least 2 hours.
2. Cook the Choux Panade
Preheat your oven to 400°F (200°C) and line a baking sheet with parchment paper. In a saucepan, combine 1/2 cup (120ml) water, 1/2 cup (120ml) whole milk, 1/2 cup (113g) unsalted butter, 1 tsp (4g) sugar, and 1/2 tsp (3g) salt.
Bring the mixture to a rolling boil over medium-high heat. Immediately remove from the heat and dump in 1 cup (120g) of all-purpose flour all at once, stirring vigorously with a wooden spoon.
Return the pan to medium-low heat and cook for 1 to 2 minutes. You will know it is ready when the dough pulls away from the sides of the pan and leaves a thin, cooked film on the bottom.
 2")
3. Incorporate the Eggs
Transfer the hot dough to the bowl of a stand mixer fitted with a paddle attachment. Beat on low speed for 1 minute to let the steam escape and cool the dough slightly.
With the mixer running, add the 4 whole eggs one at a time, allowing each egg to fully incorporate before adding the next. Stop adding eggs when the dough is glossy and smooth.
The perfect visual cue for choux dough is the “V” test. When you lift the paddle attachment, the dough should slowly drop off, forming a perfectly smooth, glossy “V” shape.
4. Pipe and Bake the Shells
Transfer the dough to a piping bag fitted with a large round tip. Pipe 2-inch (5cm) mounds onto your prepared baking sheet, leaving about 2 inches of space between each.
Dip your finger in water and gently pat down any peaks on top of the mounds to prevent them from burning. Bake at 400°F (200°C) for 20 minutes, then reduce the heat to 325°F (165°C) and bake for an additional 15 minutes.
Do not open the oven door during baking, or the steam will escape and the puffs will collapse. The exterior choux pastry shell should be baked golden brown, slightly crisp-looking, and naturally cracked.
5. Assemble and Garnish
Once the shells have cooled completely, use a serrated knife to slice each classic cream puff in half horizontally. Transfer your chilled pastry cream to a piping bag fitted with a large star tip.
Pipe a generous, thick swirl of velvety vanilla pastry cream filling onto the bottom half of each shell. Place the top half gently resting on the thick cream layer.
To finish, place the assembled pastries on a simple off-white ceramic dessert plate. Use a fine mesh sieve to apply a light dusting of white powdered sugar evenly over the top shell.
Expert Tips for Success
- Weigh Your Flour: Using exactly 120 grams of flour ensures the choux dough won’t be too wet or too dry, guaranteeing a hollow interior.
- Look for the Film: When cooking the panade on the stove, always look for the thin film on the bottom of the pot. This means the moisture has cooked out sufficiently.
- Never Open the Oven Door: Opening the oven releases trapped steam. This steam is scientifically required to force the dough to rise into a hollow shell.
- Chill the Cream Properly: The vanilla pastry cream must be completely cold to hold a generous swirl without weeping under the weight of the pastry cap.
- Slice Horizontally: Use a gentle sawing motion with a sharp serrated knife to slice the puffs cleanly without crushing the delicate, crisp exterior.
Storage & Reheating/Freezing
For the best texture, Classic Cream Puffs should be assembled right before serving so the shells remain crisp. Unfilled choux pastry shells can be stored in an airtight container at room temperature for up to 2 days.
If you want to freeze the unfilled shells, place them in a freezer-safe bag for up to 2 months. You can easily crisp them back up in a 300°F (150°C) oven for 5 minutes.
The vanilla pastry cream can be made up to 3 days in advance and stored in the refrigerator. Fully assembled cream puffs must be kept refrigerated and eaten within 24 hours before the pastry becomes soggy.
What to Serve With This
If you’re hosting an elegant dessert party or a special brunch, these Classic Cream Puffs are guaranteed to steal the show. Pair them with other complementary, elegant treats to create a stunning dessert table spread.
For a beautiful textural and flavor contrast, serve these alongside a rich, creamy earl grey panna cotta. The floral notes of the tea pair wonderfully with the rich vanilla bean cream.
If you want to offer a chocolate option for your guests, our dark chocolate orange shortbread cookies offer a wonderful, buttery bite. The dark chocolate provides a nice, slightly bitter counterbalance to the powdered sugar.
Looking for a pop of color? Adding raspberry pistachio bars to your dessert platter introduces a bright fruitiness and an appealing green and red color palette.
Finally, if you are making these during the holidays, they fit right in next to a festive no bake candy cane dessert. The crisp shells and rich fillings are a welcome staple on any seasonal dessert tray.
FAQ
Yes! The unfilled choux pastry shells can be baked and stored in an airtight container for up to 2 days or frozen for 2 months. The vanilla pastry cream can be made up to 3 days in advance. Assemble just before serving to keep the shells crisp.
Using the exact measurement of cornstarch and boiling the cream mixture for a full 1 to 2 minutes on the stove ensures the starches activate properly. It must also be chilled completely before piping.
The ‘V’ test determines if you’ve added the correct amount of eggs. When you lift the paddle attachment from the mixer, the dough should slowly drop off and leave a smooth, glossy ‘V’ shape hanging from the paddle.
Cream puffs deflate if they are pulled from the oven before the internal structure has dried out completely, or if the oven door was opened during the baking process, which allows critical steam to escape.
Closing & Subscribe
If you successfully achieved that baked golden brown choux pastry shell and that generous, thick swirl of velvety vanilla pastry cream, we want to see it! Making French pastries at home is an incredible culinary milestone.
Leave a comment below to let us know how your cream puffs turned out, and don’t forget to rate the recipe. Be sure to subscribe to our newsletter for more bakery-style recipes sent straight to your inbox.
 3")
Recipe Schema
Perfect Classic Cream Puffs (Choux Pastry & Vanilla Cream)
Ingredients
Equipment
Instructions
- In a medium saucepan, heat 2 cups (480ml) of whole milk until it just begins to simmer.
- In a separate bowl, vigorously whisk together 4 egg yolks, 1/2 cup (100g) granulated sugar, and 1/4 cup (30g) cornstarch until pale and smooth.
- Slowly pour the hot milk into the yolk mixture while whisking constantly. Return the mixture to the saucepan and cook over medium heat, whisking non-stop until thick and bubbling.
- Remove from heat. Whisk in 2 tbsp (28g) butter and 1 tbsp (15ml) vanilla bean paste. Transfer to a bowl, press plastic wrap directly to the surface, and chill for at least 2 hours.
- Preheat oven to 400°F (200°C). In a saucepan, bring water, milk, butter, sugar, and salt to a rolling boil over medium-high heat.
- Remove from heat, dump in flour all at once, and stir vigorously. Return to medium-low heat and cook for 1-2 minutes until a thin film forms on the bottom of the pot.
- Transfer dough to a stand mixer and beat for 1 minute to cool. Add eggs one at a time, beating well after each, until the dough is smooth and forms a glossy 'V' shape when dropped from the paddle.
- Pipe 2-inch mounds onto a parchment-lined baking sheet. Bake at 400°F (200°C) for 20 minutes, then lower heat to 325°F (165°C) and bake for 15 more minutes. Do not open the oven door.
- Once completely cool, slice in half horizontally. Pipe a thick swirl of pastry cream onto the bottom half, place the top half gently over the cream, and finish with a dusting of powdered sugar.
Notes
Never Open the Oven Door: Opening the oven releases trapped steam. This steam is scientifically required to force the dough to rise into a hollow shell.