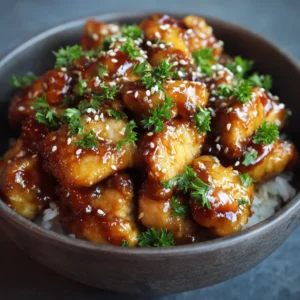
There is something undeniably magnetic about a bowl of Honey Butter Chicken when done right. Imagine crispy, golden-brown pan-fried chicken breast chunks, thickly coated in a glossy, sticky amber glaze. Every single bite delivers a satisfying crunch followed by a rich, melt-in-your-mouth buttery sweetness that instantly elevates your weeknight dinner rotation.
This recipe was meticulously designed to mimic the exact sensory experience of your favorite high-end takeout. Served in a rustic bowl over a steaming bed of fluffy white rice, the thick glaze pools slightly at the bottom, creating a savory syrup you will want to devour. Glistening with perfection and sprinkled with finely chopped fresh green parsley and toasted white sesame seeds, this dish is a feast for both the eyes and the palate.

The Sensational Appeal of This Glossy Amber Dish
- Unmatched Textural Contrast: The dual-dredge of cornstarch and flour ensures the chicken develops an ultra-crispy golden-brown crust that stands up to the thick sauce.
- Rich, Balanced Glaze: A masterful combination of pure honey, unsalted butter, and a splash of umami-rich soy sauce creates a sticky amber honey butter glaze that perfectly coats every crevice.
- Aesthetic Perfection: The visual contrast of the bright green parsley and nutty white sesame seeds against the deeply caramelized chicken is pure culinary artwork.
- Comforting Foundation: Served over fluffy steamed white rice, the warm, comforting base absorbs any excess glaze pooling delightfully at the bottom of the bowl.
Foundational Elements for the Perfect Crunch and Glaze
Boneless Skinless Chicken Breasts: You will need 1 lb (450g) of chicken, chopped into uniform 1-inch (2.5cm) chunks. This ensures even cooking and maximizes the surface area for the crispy coating.
The Crispy Breading Blend: A mixture of 1/4 cup (30g) cornstarch and 1/4 cup (30g) all-purpose flour is non-negotiable. The cornstarch provides a light, shatter-crisp texture while the flour grounds the crust.
Savory Seasonings: We use 1 tsp (5g) kosher salt, 1/2 tsp (2g) black pepper, and 1/2 tsp (2g) garlic powder mixed into the breading. These invisible foundational ingredients ensure the chicken is flavorful all the way through.
Frying Oil: Bring 3 tbsp (45ml) of neutral cooking oil, like canola or vegetable, to the skillet. Neutral oil allows for a high-heat sear without altering the delicate flavor of the dish.
The Honey Butter Sauce: Gather 4 tbsp (56g) unsalted butter, 1/3 cup (80ml) pure honey, 1 tbsp (15ml) soy sauce, and 2 cloves (6g) minced garlic. The soy sauce is the secret weapon here, providing the deep amber hue and cutting through the intense sweetness.
Fresh Garnishes: You will need 1 tbsp (4g) finely chopped fresh green parsley and 1 tbsp (9g) toasted white sesame seeds. These add bright herbal notes and a sophisticated, nutty finish.
The Base: Prepare 2 cups (300g) of fluffy steamed white rice. A long-grain variety like jasmine works beautifully to soak up the glorious pan drippings.
Culinary Equipment Required for a Flawless Sear
- Large Cast-Iron or Heavy-Bottomed Skillet: Essential for retaining heat and developing that deep, rustic golden-brown sear on the chicken chunks.
- Shallow Dredging Bowls: Perfect for tossing the chicken evenly in the cornstarch and flour mixture without making a massive mess.
- Silicone Spatula: The best tool for scraping every last drop of the sticky, glossy glaze from the pan over your finished dish.
- Sharp Chef’s Knife: Necessary for finely mincing the garlic and achieving those perfectly uniform fresh green parsley cuts.

Master Class: Achieving the Signature Golden-Brown Sear
Creating the Crispy Cornstarch Coating
In a large mixing bowl, combine the 1/4 cup (30g) cornstarch, 1/4 cup (30g) all-purpose flour, 1 tsp (5g) kosher salt, 1/2 tsp (2g) black pepper, and 1/2 tsp (2g) garlic powder. Toss the 1 lb (450g) of chicken breast chunks into the dry mixture until thickly and evenly coated. Shake off any excess powder so the oil does not instantly burn during frying.
Pan-Frying to a Sizzling Golden Perfection
Heat the 3 tbsp (45ml) neutral cooking oil in your skillet over medium-high heat until it shimmers. Carefully place the dusted chicken pieces into the pan in a single layer, ensuring they do not touch. Sear undisturbed for 3-4 minutes per side until a deep, crispy golden-brown crust forms, then remove the chicken and set aside on a wire rack.
Simmering the Thick Honey Butter Glaze
Wipe the skillet clean and lower the heat to medium-low. Melt the 4 tbsp (56g) unsalted butter, then whisk in the 2 cloves (6g) minced garlic, cooking for 30 seconds until fragrant. Pour in the 1/3 cup (80ml) honey and 1 tbsp (15ml) soy sauce, allowing the mixture to bubble and thicken for 2 minutes into a glossy amber glaze.
Assembling the Rice Bowl with Garnishes
Toss the crispy chicken back into the skillet, folding gently until every piece is thickly coated and glistening. Spoon 1/2 cup (75g) of fluffy steamed white rice into a dark grey rustic bowl. Top generously with the sticky chicken, allowing the thick glaze to pool slightly at the bottom, and finish by sprinkling the 1 tbsp (4g) fresh chopped green parsley and 1 tbsp (9g) toasted white sesame seeds over the top.
Pro Troubleshooting for Perfectly Coated Bites
- Preventing Soggy Chicken: Always fry the chicken in batches if your pan is too small. Crowding the skillet lowers the oil temperature and leads to steaming instead of a crisp sear.
- Glaze Consistency Check: If your honey butter sauce is too thin, let it simmer for an extra minute. If it becomes too thick and candy-like, whisk in 1 tbsp (15ml) of warm water to loosen it back to a syrupy state.
- Sesame Seed Roasting: If your white sesame seeds are raw, toast them in a dry skillet over low heat for 2 minutes until fragrant before garnishing. It exponentially enhances their flavor profile.
- Resting the Rice: Let your steamed rice sit covered off the heat for 5 minutes before serving. This ensures it is perfectly fluffy and ready to absorb the rich buttery pan drippings.
Maximizing Freshness and Reheating Strategies
To store your leftovers, keep the chicken and the rice in separate airtight containers in the refrigerator for up to 3 days. Keeping them separate prevents the rice from soaking up all the moisture and turning mushy. The glaze will naturally solidify in the cold environment due to the high butter content.
For the best reheating results, avoid the microwave if possible. Instead, place the sticky chicken chunks on a parchment-lined baking sheet and warm them in a 350°F (175°C) oven for 8-10 minutes. This revives the crispy crust while gently remelting the sweet amber coating back to its glossy glory.
Complementary Pairings for Your Dinner Table
While this dish is phenomenal on its own, building a well-rounded culinary spread elevates the entire dining experience. If you love sweet and savory profiles, try matching this recipe with our equally crave-worthy honey garlic chicken breasts for a fantastic chicken duo. Alternatively, you can mix up your proteins for the week by leaning into an Asian-inspired spread with a stunning teriyaki chicken rice bowl.
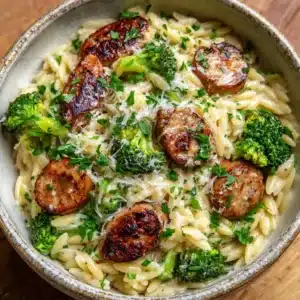
For those who love deeply savory, comforting sauces, setting this dish alongside an authentic Indian butter chicken gives your guests incredible variety. If you want to sneak some extra greens onto the table without sacrificing richness, a side of creamy broccoli cheese rice casserole acts as the ultimate comforting vegetable pairing.
Uncovering the Secrets of Perfect Glazed Chicken
Absolutely. Boneless skinless chicken thighs work wonderfully for this recipe. Because they have a higher fat content, they remain incredibly juicy, though you may need to fry them an extra minute to achieve the same golden-brown crust.
To maintain maximum crunch, toss the chicken in the glaze immediately before serving. A dual-dredge of cornstarch and flour ensures the crust is sturdy enough to hold up against the sticky sauce without instantly softening.
No, this recipe focuses on sweet, savory, and buttery flavor profiles with zero heat. If you want to add a kick, a pinch of red pepper flakes or a dash of sriracha whisked into the glaze works beautifully.
Store the chicken and rice in separate airtight containers in the fridge. To reheat, bake the chicken pieces at 350°F (175°C) for 8-10 minutes to crisp up the coating and remelt the rich butter glaze.
Glaze separation usually happens if the heat is too high or the butter is melted too quickly. Simmer the glaze over medium-low heat, constantly whisking so the honey, butter, and soy sauce emulsify into a smooth, glossy amber sauce.
The Complete Crispy Honey Butter Chicken Blueprint
Honey Butter Chicken: The Ultimate Crispy Rice Bowl
Ingredients
Equipment
Instructions
- In a large mixing bowl, combine the cornstarch, all-purpose flour, kosher salt, black pepper, and garlic powder. Toss the chicken breast chunks into the dry mixture until thickly and evenly coated. Shake off any excess powder.
- Heat the neutral cooking oil in a skillet over medium-high heat. Carefully place the dusted chicken pieces into the pan in a single layer. Sear undisturbed for 3-4 minutes per side until a deep crispy golden-brown crust forms, then remove and set aside.
- Wipe the skillet clean and lower the heat to medium-low. Melt the unsalted butter, then whisk in the minced garlic for 30 seconds. Pour in the honey and soy sauce, allowing it to bubble and thicken for 2 minutes into a glossy amber glaze.
- Toss the crispy chicken back into the skillet until thickly coated. Spoon the steamed white rice into a bowl, top with the sticky chicken and glaze, and garnish with fresh chopped green parsley and toasted white sesame seeds.
Notes
If the honey butter sauce is too thick, whisk in 1 tbsp (15ml) of warm water.

Share Your Culinary Masterpiece
We hope this step-by-step guide helps you achieve the ultimate crispy, glossy chicken bowl right in your own kitchen! If you loved the textural contrast and rich flavors of this dish, please leave a comment and a five-star rating below. Do not forget to subscribe to our newsletter for more ad-optimized, easy weeknight dinner solutions.
If you snapped a photo of your beautiful rustic bowl, we want to see it! Share your creations and pin this recipe to your dinner boards over on Pinterest. Happy cooking!