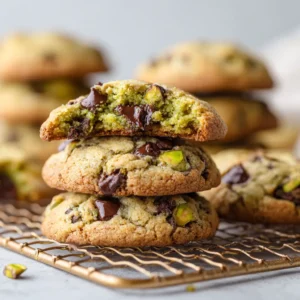
Welcome to your new favorite holiday tradition! These No-Bake Christmas Cheesecake Bites are the perfect solution for a festive, delicious, and incredibly easy dessert. Forget spending hours by the oven; these little bites of joy come together with minimal effort and maximum cheer. They are creamy, rich, and perfectly portioned for any Christmas party or family gathering. Whether you’re a seasoned baker or just looking for a simple holiday recipe, you’ll find these cheesecake bites are a guaranteed crowd-pleaser.
With a buttery Oreo cookie crust, a velvety smooth cream cheese filling, and endless possibilities for festive decorations, this recipe is as fun to make as it is to eat. We’re going to walk through every step to ensure your cheesecake bites are absolutely perfect. Ready to make the best no-bake dessert of the season? Let’s get started!

Why This Is the Only Recipe You’ll Need
In a season filled with complex recipes, the simplicity of these cheesecake bites is a breath of fresh air. They solve the need for a quick, elegant, and festive dessert that doesn’t require any baking.
- Incredibly Easy: With simple ingredients and no oven required, this is a perfect recipe for all skill levels.
- Perfectly Festive: Easily customized with red and green sprinkles, crushed candy canes, or a chocolate drizzle, they look beautiful on any holiday dessert table.
- Make-Ahead Friendly: Prepare them a day or two in advance to save time and reduce holiday stress. They firm up beautifully in the fridge.
- Crowd-Pleasing Flavor: The combination of a rich, tangy cheesecake filling and a crunchy chocolate cookie crust is a classic favorite that everyone loves.
Essential Ingredients
This recipe uses simple, easy-to-find ingredients to create a truly spectacular dessert. Here’s what you’ll need:
For the Oreo Crust:
- Oreo Cookies: You’ll need about 24 standard Oreo cookies. The entire cookie—cream filling and all—gets crushed to form the base.
- Unsalted Butter: Melted butter binds the cookie crumbs together, creating a firm and delicious crust.
For the Cheesecake Filling:
- Cream Cheese: Use full-fat, block-style cream cheese for the best texture and flavor. Ensure it’s softened to room temperature to avoid lumps.
- Powdered Sugar: This dissolves easily into the filling, creating a smooth, sweet base.
- Heavy Whipping Cream: Whipped to stiff peaks, it gives the filling its light, airy, and stable structure.
- Vanilla Extract: A splash of pure vanilla extract enhances the classic cheesecake flavor.
- A Pinch of Salt: Just a little salt balances the sweetness and brings out the other flavors.
For the Festive Toppings:
- White Chocolate: Melted white chocolate provides a beautiful canvas for decorations.
- Christmas Sprinkles: Red, green, and white sprinkles add an instant festive touch.
- Crushed Peppermint or Candy Canes: For a minty, holiday flavor and a bit of crunch. If you love peppermint, you should also try these no-bake peppermint balls.

Step-by-Step Instructions
Follow these simple steps to create perfect No-Bake Christmas Cheesecake Bites every time. The key is to work with cold ingredients (where specified) and allow adequate chilling time.
Step 1: Prepare the Pan
Line a standard 12-cup muffin tin with paper or silicone liners. This prevents the bites from sticking and makes for easy removal and serving. Set it aside.
Step 2: Make the Oreo Crust
Place the Oreo cookies in a food processor and pulse until they form fine crumbs. If you don’t have a food processor, you can place them in a zip-top bag and crush them with a rolling pin. Transfer the crumbs to a medium bowl and pour in the melted butter. Stir with a fork until all the crumbs are evenly moistened. Press about 1 tablespoon of the mixture firmly into the bottom of each muffin liner. Use the back of a spoon or the bottom of a small glass to pack it down tightly. Place the pan in the freezer to set while you prepare the filling.
Step 3: Whip the Cream
In a large bowl, using an electric hand mixer or a stand mixer with the whisk attachment, beat the cold heavy whipping cream on high speed until stiff peaks form. Be careful not to over-whip. The cream should hold its shape when you lift the beaters. Set aside.
Step 4: Make the Cheesecake Filling
In a separate large bowl, beat the softened cream cheese and powdered sugar on medium speed until smooth and creamy, with no lumps remaining. Scrape down the sides of the bowl as needed. Add the vanilla extract and salt, and beat until just combined. Gently fold the whipped cream into the cream cheese mixture in two or three additions until it’s fully incorporated and the filling is light and airy. Be careful not to deflate the whipped cream.
Step 5: Assemble and Chill
Remove the muffin tin from the freezer. Spoon or pipe the cheesecake filling evenly over the Oreo crusts in each liner, smoothing the tops with a small spatula or the back of a spoon. Cover the muffin tin with plastic wrap and refrigerate for at least 4-6 hours, or preferably overnight, until the cheesecake bites are firm.
Step 6: Decorate and Serve
Once the cheesecake bites are fully chilled and firm, carefully remove them from the muffin tin. Melt the white chocolate in a microwave-safe bowl in 30-second intervals, stirring in between, until smooth. Drizzle the melted white chocolate over each cheesecake bite, and immediately top with your favorite Christmas sprinkles or crushed peppermint. Allow the chocolate to set for a few minutes before serving. For another delightful cheesecake recipe, check out our Pecan Pie Cheesecake.
Pro Tips for Perfect Cheesecake Bites
These tips will help you master this simple recipe and troubleshoot any common issues.
- Use Room Temperature Cream Cheese: This is the most important tip for a lump-free filling. Set the cream cheese blocks on the counter for at least an hour before you begin.
- Don’t Overmix the Filling: Once you fold in the whipped cream, mix only until just combined to keep the filling light and airy.
- Chill Thoroughly: Don’t rush the chilling process! The cheesecake bites need several hours to set properly. Chilling them overnight is the best way to ensure they are firm enough to hold their shape.
- Easy Removal: Using paper or silicone liners is the easiest way to get the bites out of the pan cleanly. If you’re not using liners, lightly grease the muffin tin.
Delicious Variations
While the classic recipe is a hit, you can easily customize these No-Bake Christmas Cheesecake Bites to suit your tastes.
- Gingersnap Crust: Swap the Oreos for gingersnap cookies for a warm, spiced holiday flavor.
- Peppermint Filling: Add 1/4 teaspoon of peppermint extract to the cheesecake filling for a minty twist that pairs perfectly with a crushed candy cane topping.
- Chocolate Drizzle: Use melted dark or milk chocolate instead of white chocolate for a different flavor profile.
- Caramel Swirl: For a decadent treat, try a recipe like these Salted Caramel Pretzel Cheesecake Balls.
Storage Instructions
Proper storage is key to keeping your cheesecake bites fresh and delicious.
- Refrigeration: Store the bites in an airtight container in the refrigerator for up to 5 days. Keeping them covered prevents them from absorbing any other fridge odors.
- Freezing: These bites freeze wonderfully! Place them in a single layer on a baking sheet and freeze until solid. Then, transfer them to a freezer-safe container or bag. They can be frozen for up to 2 months. To thaw, simply place them in the refrigerator for a few hours before serving.
Absolutely! These are a perfect make-ahead dessert. You can prepare them up to 2 days in advance and store them covered in the refrigerator until you’re ready to serve.
Yes, they freeze beautifully. Place the finished bites on a baking sheet to freeze individually, then transfer them to a freezer-safe container for up to 2 months. Thaw in the fridge before serving.
The key is to use block-style, full-fat cream cheese that has been softened to room temperature. This allows it to blend smoothly with the powdered sugar, eliminating any chance of lumps.
For the best results, they should chill for a minimum of 4-6 hours. However, chilling them overnight is highly recommended to ensure they are fully set and firm.
You can easily substitute the Oreos with other cookies. Gingersnaps, Biscoff cookies, or even shortbread cookies would make a delicious crust for these cheesecake bites.
Enjoy Your Festive Creation!
These No-Bake Christmas Cheesecake Bites are more than just a dessert; they’re a simple way to bring a little extra sweetness and joy to your holiday celebrations. They’re quick, festive, and delicious, making them the perfect addition to your recipe collection. We hope you and your loved ones enjoy every last bite!
If you make this recipe, we’d love to see it! Share your creations and tag us. For more holiday inspiration, be sure to follow us on Pinterest!

No-Bake Christmas Cheesecake Bites: The Ultimate Festive Treat
Create the ultimate festive treat with these easy No-Bake Christmas Cheesecake Bites! This recipe features a crunchy Oreo crust, a creamy cheesecake filling, and fun holiday toppings. No oven required!
Ingredients
Equipment
Instructions
- Line a 12-cup muffin tin with paper or silicone liners.
- Crush the Oreo cookies into fine crumbs using a food processor or a rolling pin. Mix the crumbs with the melted butter until fully combined. Press about 1 tablespoon of the mixture into the bottom of each liner. Freeze while you prepare the filling.
- In a large bowl, beat the cold heavy whipping cream with an electric mixer until stiff peaks form.
- In a separate bowl, beat the softened cream cheese and powdered sugar until smooth. Add the vanilla extract and salt and mix to combine. Gently fold the whipped cream into the cream cheese mixture until no streaks remain.
- Spoon the filling evenly over the crusts in the muffin tin. Smooth the tops. Cover and refrigerate for at least 4-6 hours, or overnight, until firm.
- Once firm, remove the bites from the liners. Drizzle with melted white chocolate and top immediately with sprinkles or crushed peppermint. Let the chocolate set for a few minutes before serving.
Notes
Tip 1: Ensure your cream cheese is fully softened to room temperature to prevent a lumpy filling.
Tip 2: Do not rush the chilling time! The cheesecake bites need to be fully firm to hold their shape.
Tip 3: For easy decorating, place the melted chocolate in a small zip-top bag and snip off a tiny corner to drizzle.
No-Bake Christmas Cheesecake Bites: The Ultimate Festive Treat
Ingredients
Equipment
Instructions
- Line a 12-cup muffin tin with paper or silicone liners.
- Crush the Oreo cookies into fine crumbs using a food processor or a rolling pin. Mix the crumbs with the melted butter until fully combined. Press about 1 tablespoon of the mixture into the bottom of each liner. Freeze while you prepare the filling.
- In a large bowl, beat the cold heavy whipping cream with an electric mixer until stiff peaks form.
- In a separate bowl, beat the softened cream cheese and powdered sugar until smooth. Add the vanilla extract and salt and mix to combine. Gently fold the whipped cream into the cream cheese mixture until no streaks remain.
- Spoon the filling evenly over the crusts in the muffin tin. Smooth the tops. Cover and refrigerate for at least 4-6 hours, or overnight, until firm.
- Once firm, remove the bites from the liners. Drizzle with melted white chocolate and top immediately with sprinkles or crushed peppermint. Let the chocolate set for a few minutes before serving.
Notes
Tip 2: Do not rush the chilling time! The cheesecake bites need to be fully firm to hold their shape.
Tip 3: For easy decorating, place the melted chocolate in a small zip-top bag and snip off a tiny corner to drizzle.