Welcome to the last Easy Apple Pie Recipe you will ever need. Forget complicated steps and hard-to-find ingredients. This recipe is designed for enthusiastic home cooks who want to create a classic, comforting dessert without the fuss. We’re talking about a perfectly flaky crust, a warm, spiced apple filling, and a sense of accomplishment you can taste. Whether it’s for a holiday gathering, a family dinner, or just a cozy Tuesday night, this pie is sure to become a cherished favorite.
Why You’ll Love This Easy Apple Pie Recipe
This isn’t just another dessert; it’s a foolproof guide to creating a masterpiece in your own kitchen. We’ve simplified every step to ensure you get a delicious, beautiful pie every single time.
- Truly Simple: We use a pre-made crust to save time and effort, focusing on a spectacular filling.
- Perfectly Spiced Filling: A balanced blend of cinnamon, nutmeg, and a hint of allspice makes the apple filling sing.
- No More Soggy Bottoms: We have a secret tip that guarantees a crisp, golden-brown bottom crust.
- Crowd-Pleasing Classic: This is the timeless apple pie that evokes nostalgia and creates new memories.
The Best Apples for a Perfect Pie
The key to a great apple pie is using the right apples. You want a variety that holds its shape during baking and offers a balance of sweet and tart flavors. Avoid softer apples like Red Delicious, as they can turn to mush.
 1")
Our top recommendations are:
- Granny Smith: The classic choice for a reason. They are firm and distinctly tart, holding up beautifully to baking.
- Honeycrisp: A wonderful option that is firm, crisp, and has a lovely sweet-tart flavor profile.
- Braeburn: These apples offer a crisp texture and a complex, spicy-sweet flavor that is incredible in pie.
- A Mix: For the most dynamic flavor, use a combination of Granny Smith and Honeycrisp!
Ingredients You’ll Need
This simple apple pie uses pantry staples, making it easy to whip up whenever the craving strikes. No complex ingredients, just pure, simple flavor.
For the Apple Filling:
- 6-8 medium apples (about 3 pounds), peeled, cored, and sliced 1/4-inch thick
- 3/4 cup granulated sugar
- 1/4 cup all-purpose flour
- 1 teaspoon ground cinnamon
- 1/4 teaspoon ground nutmeg
- 1/8 teaspoon ground allspice
- 1 tablespoon lemon juice
- 2 tablespoons unsalted butter, cut into small pieces
For the Crust:
- 1 package (2 crusts) refrigerated pie dough, or your favorite homemade recipe
- 1 large egg, beaten (for egg wash)
- 1 tablespoon turbinado sugar, for sprinkling
How to Make This Easy Apple Pie Recipe (Step-by-Step)
Follow these straightforward instructions for a flawless homemade apple pie. We’ll guide you through preparing the filling, assembling the pie, and baking it to golden perfection.
 2")
Step 1: Prepare the Apple Filling
In a large bowl, gently toss the sliced apples with the lemon juice. In a separate, smaller bowl, whisk together the granulated sugar, all-purpose flour, cinnamon, nutmeg, and allspice. Pour the sugar mixture over the apples and toss until every slice is evenly coated. This simple method ensures your filling is flavorful and thickens perfectly during baking.
Step 2: Assemble the Pie
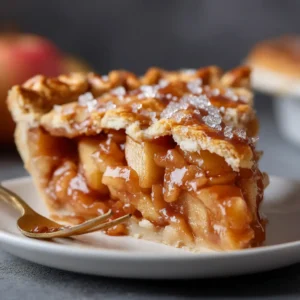
Preheat your oven to 425°F (220°C). Gently unroll one of the pie crusts and press it into a 9-inch pie plate. To avoid a soggy bottom, you can lightly prick the bottom with a fork. Pour the prepared apple filling into the crust-lined plate, spreading it evenly. Dot the top of the filling with the small pieces of unsalted butter. This adds a wonderful richness as the pie bakes.
Unroll the second pie crust. You can either place it over the top as a solid crust (cutting a few slits for steam to escape) or cut it into strips to create a lattice top. Crimp the edges of the top and bottom crusts together to seal. For a beautiful, glossy finish, brush the entire top crust with the beaten egg and sprinkle generously with turbinado sugar.
Step 3: Bake to Golden Perfection
Place the pie on a baking sheet to catch any potential drips. Bake at 425°F (220°C) for 15 minutes. Then, reduce the oven temperature to 375°F (190°C) and continue to bake for another 35-45 minutes. The pie is done when the crust is a deep golden brown and the filling is bubbly. If the edges of the crust start to brown too quickly, you can cover them with aluminum foil.
Once baked, remove the pie from the oven and let it cool on a wire rack for at least 2-3 hours before slicing. This resting period is crucial, as it allows the filling to set properly. Slicing into a hot pie can result in a runny filling.
Pro Tips for the Best Homemade Apple Pie
- Slice Apples Evenly: Try to keep your apple slices a uniform thickness to ensure they cook at the same rate.
- Don’t Skip the Lemon Juice: It not only adds a bright flavor but also prevents the apples from browning as you prepare the filling.
- Let It Cool Completely: We can’t stress this enough! Patience is key. A fully cooled pie will give you those clean, beautiful slices you see in bakeries.
- Serving Suggestion: This easy apple pie is fantastic on its own, but serving it warm with a scoop of vanilla ice cream or a dollop of whipped cream is pure bliss. For a different kind of fruity dessert, you might also enjoy this delicious peach cobbler poke cake.
Storing and Freezing Instructions
Proper storage ensures your delicious apple pie stays fresh. The pie can be stored, loosely covered, at room temperature for up to 2 days. If you need to keep it longer, cover it and store it in the refrigerator for up to 4-5 days.
To freeze, you can either freeze the pie before baking or after. For an unbaked pie, wrap it tightly in plastic wrap and then aluminum foil and freeze for up to 3 months. Bake directly from frozen, adding about 20-25 extra minutes to the baking time. A baked pie can be frozen in the same way; just thaw it in the refrigerator before serving.
Frequently Asked Questions
Yes! You can assemble the entire pie, but don’t add the egg wash. Wrap it tightly in plastic wrap and foil and freeze it. You can bake it directly from frozen, just add about 20-25 minutes to the total baking time.
To prevent a soggy bottom, ensure your oven is fully preheated to 425°F for the initial bake. This high heat helps set the bottom crust quickly. Placing your pie plate on a preheated baking sheet can also help crisp up the bottom.
You can store leftover apple pie loosely covered at room temperature for up to two days. For longer storage, cover it and keep it in the refrigerator for up to five days.
For this easy recipe, there is no need to pre-cook the filling. Slicing the apples thinly and tossing them with flour and sugar allows them to cook to tender perfection inside the pie crust as it bakes.
The best apples for pie are firm, hold their shape, and have a good balance of sweet and tart flavors. We recommend using Granny Smith, Honeycrisp, Braeburn, or a combination of these for the most delicious result.
More Delicious Dessert Recipes to Try
If you loved this simple pie, you’ll love exploring other crowd-pleasing desserts. For a bigger group, this Apple Slab Pie Recipe is a fantastic alternative. And if you’re a fan of sweet and salty, don’t miss this addictive Salted Caramel Pretzel Bark. For a truly decadent treat, give this Caramel Brownie Cheesecake a try.
The Easiest Apple Pie You’ll Ever Make!
This Easy Apple Pie Recipe proves that you don’t need to be a professional baker to create a stunning, delicious dessert. With just a few simple ingredients and our straightforward steps, you can bring the cozy, comforting aroma of homemade apple pie into your home. We hope you love making—and eating—it as much as we do.
Easy Apple Pie Recipe (That's Actually Easy!)
Ingredients
Equipment
Instructions
- Preheat oven to 425°F (220°C).
- In a large bowl, toss the sliced apples with lemon juice. In a small bowl, whisk together granulated sugar, flour, cinnamon, nutmeg, and allspice. Pour the sugar mixture over the apples and toss to coat evenly.
- Gently place one pie crust into a 9-inch pie plate. Pour the apple filling into the crust and spread it evenly. Dot the top of the filling with the pieces of unsalted butter.
- Place the second crust over the filling. Trim and crimp the edges to seal. Brush the top with the beaten egg and sprinkle with turbinado sugar. Cut a few slits in the top crust to allow steam to escape.
- Place the pie on a baking sheet. Bake for 15 minutes at 425°F (220°C). Then, reduce the heat to 375°F (190°C) and bake for an additional 35-45 minutes, or until the crust is golden and the filling is bubbly.
- Let the pie cool on a wire rack for at least 2-3 hours before slicing and serving. This allows the filling to set.
Notes
Prevent Browning: If the crust edges brown too quickly, cover them with foil for the remainder of the baking time.
Cooling is Key: Do not skip the cooling step! It is essential for ensuring the filling sets properly for clean slices.
If you’ve tried this recipe, we’d love to hear from you! Please leave a comment below and share your creation on Pinterest. Your feedback helps us and inspires other home cooks!
 4")